Take some pictures for me please. I'd love to see the block when you're done!
I've got a plan to eliminate the need for pigtails. I found a new item from Mouser that are expandable, slide and snap ATO fuses that are fed from connectors on the back. They sell them in 14 gauge and 10 gauge crimp style to the same fuse body and I've used one already for the dedicated fuse I ran to the cigarette lighter (that wire was upgraded to 14 too) because the gentleman who owns the car will possibly be using it for a power port. I'm going to get a friend of mine to mill out a face plate for the panel mount fuse holders, and see if we can't put a small threaded standoff in the center to hold a cover kind of like that. I wish I could find a premanufactured cover for it like that, though. The fuse blocks cost about 65 cents a piece, and the crimp connectors (which take solder very well) were like 14 cents a piece.
Burned wires, upgrading fuse box, need help...
-
Raze
Re: Burned wires, upgrading fuse box, need help...
will do, can you give me part numbers for the Mouser connectors, those sound like what would be ideal, I just gave up looking for something like that because it was so hard to search electronics parts catalogs. I'm wondering if those would be easier to deal with than the butt-connectors, and simpler to boot. The nice thing about the fuse block I have is the back plates come off and you can modify the internals to your hearts content (with a dremel of course), But you could also cut out most of the internals and keep the housing...
-
NGinuity
Re: Burned wires, upgrading fuse box, need help...
SURE! They are made by Littelfuse, I think the same company that made the block in Matt's mod.
The connector body is:
http://www.mouser.com/Search/ProductDet ... 68-062-000
Mouser Part #: 576-868-062-000
Manufacturer Part #: 868-062-000
The 14 gauge terminal is:
http://www.mouser.com/Search/ProductDet ... 76-913-043
Mouser Part #: 576-913-043
Manufacturer Part #: 913-043
And the 10 gauge terminal is:
http://www.mouser.com/ProductDetail/Lit ... qgZqFI8%3d
Mouser Part #: 576-913-042
Manufacturer Part #: 913-042
You will have to fabricate a panel for those to snap in, but it looks very clean. Here's the data sheet if you would like to look at the specifics: http://www.littelfuse.com/data/en/Data_ ... OPanel.pdf
-
Raze
Re: Burned wires, upgrading fuse box, need help...
Ah, so I assume you're going to run all the necessary wires (I think upwards of 4 14 ga) into 1 of the terminals to mimic the original fuse block's 2 + 2 on the lettered side? Those are pretty slick by the way, definitely clean install...
I just picked up the necessary butt-connectors last night and larger size spades for the pigtails, I'm stepping all up to 10ga which will be more than enough given the amp ratings on the fuses, even joining multiple wires.
I just picked up the necessary butt-connectors last night and larger size spades for the pigtails, I'm stepping all up to 10ga which will be more than enough given the amp ratings on the fuses, even joining multiple wires.
-
NGinuity
Re: Burned wires, upgrading fuse box, need help...
Yep, you got it! I've used ATO panel mounts before, but this is the first time I've used one on a fuse block swap. Each one of those 10 gauge prongs (the new ones), can handle up to 30 amps, so each fuse being in the neighborhood of 10-15 isn't bad at all, even on bundled 14 gauge.
-
donm
- Patron 2018

- Posts: 294
- Joined: Sun May 30, 2010 12:40 pm
- Your car is a: 1980 spider [carb]
- Location: Hamilton. MA
Re: Burned wires, upgrading fuse box, need help...
Regarding the inertia switch for the fuel pump, I wish I had the part number for you but you can get a suitable one at any Ford dealer. It's black and has a red reset button. I think I paid about $35. I mounted it in the trunk, solidly bolted to the wheel well arch right next to and in series with the feed to the pump. Seems to work great although I hope I never have to really test it.
Don
Don
1979 Spider
2001Saab SW
2004 Saab Aero
Life's too short to drive boring cars
2001Saab SW
2004 Saab Aero
Life's too short to drive boring cars
-
Raze
Re: Burned wires, upgrading fuse box, need help...
No worries Don, I have one on my 86 XR4Ti track rat I can pull the P/N off of and get the interchange, I was actually going to snag one from a J/Y since no one ever takes things like thatdonm wrote:Regarding the inertia switch for the fuel pump, I wish I had the part number for you but you can get a suitable one at any Ford dealer. It's black and has a red reset button. I think I paid about $35. I mounted it in the trunk, solidly bolted to the wheel well arch right next to and in series with the feed to the pump. Seems to work great although I hope I never have to really test it.
Don
and uh, yeah, I totally agree, I'll feel better with it there, but hope I never have to 'test' it...
-
Raze
Re: Burned wires, upgrading fuse box, need help...
NGinuity wrote:Yep, you got it! I've used ATO panel mounts before, but this is the first time I've used one on a fuse block swap. Each one of those 10 gauge prongs (the new ones), can handle up to 30 amps, so each fuse being in the neighborhood of 10-15 isn't bad at all, even on bundled 14 gauge.
Sweet, I want to see some pics when you're in-progress. I'll be taking some more this weekend, looks like I'll finally have time to do the block. I'll try and take some pics of all the burned up wires and the 'mess' I had to deal with.
-
Raze
Re: Burned wires, upgrading fuse box, need help...
Ok,
so I ended up going to the rifle range w/my buddy and had to do general maintenance on my wife's daily and a little work on the track car so the Fiat got pushed. I did remove the stereo (the one that burned up and caused half this mess to begin with). I also had to get some different butt connectors, you need 8ga connectors to fit 2 10 ga wires for pigtails. I got straight 8-8ga butt connectors and step down 8-10ga butt connectors, then I also have 10-10ga. These were all readily available at NAPA and list the parts online. The reason for going this route was to make the process fast and simple. I hope to begin the crimping work this week. After that it's ensuring all the gauges are working properly!
so I ended up going to the rifle range w/my buddy and had to do general maintenance on my wife's daily and a little work on the track car so the Fiat got pushed. I did remove the stereo (the one that burned up and caused half this mess to begin with). I also had to get some different butt connectors, you need 8ga connectors to fit 2 10 ga wires for pigtails. I got straight 8-8ga butt connectors and step down 8-10ga butt connectors, then I also have 10-10ga. These were all readily available at NAPA and list the parts online. The reason for going this route was to make the process fast and simple. I hope to begin the crimping work this week. After that it's ensuring all the gauges are working properly!
-
Raze
Re: Burned wires, upgrading fuse box, need help...
Finally got some pictures of the 'mess':

Here's the serious problem, and the basic reason for swapping the fuse block:
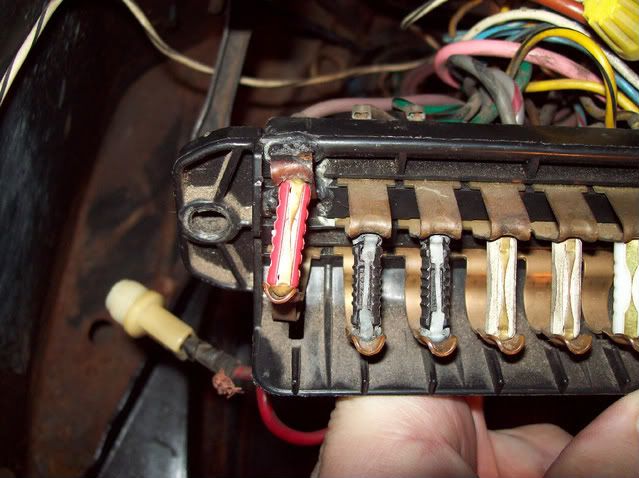
Notice that red wire with the inline fuse plug sticking out the back? Yeah, that was connected to the melted fuse, and here's the problem:
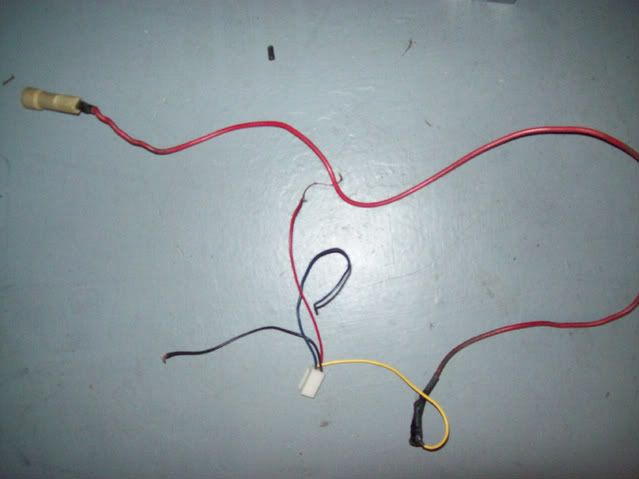
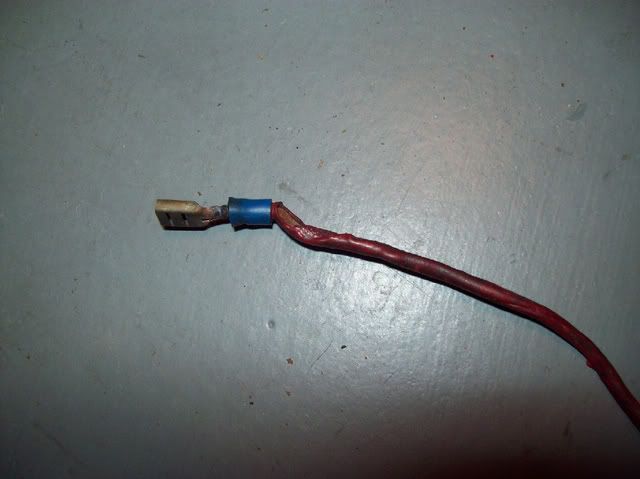
Here are a bunch of the other burned up wires:
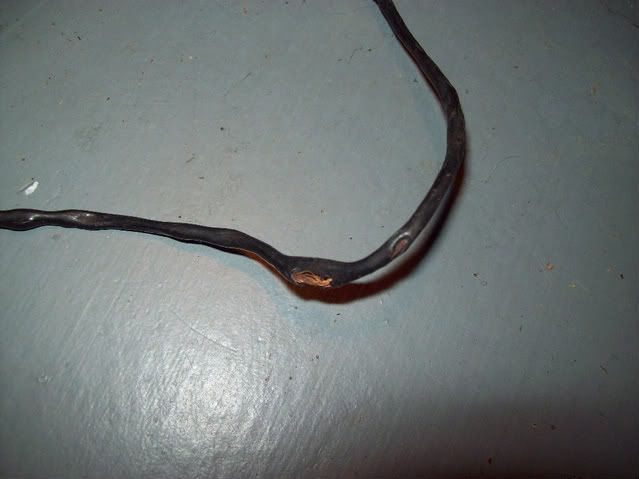

Here was the awesome power lines to the ignition coil:
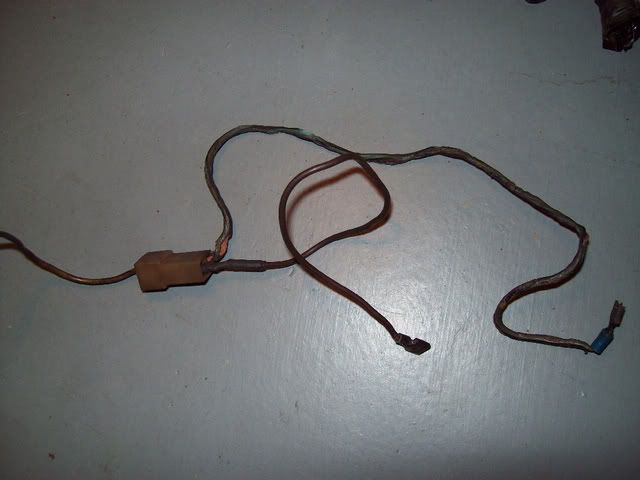
Here's the wire to the electric choke on the carb (doesn't show how badly the line was exposed.) Not to mention all the other loose everything under the hood:
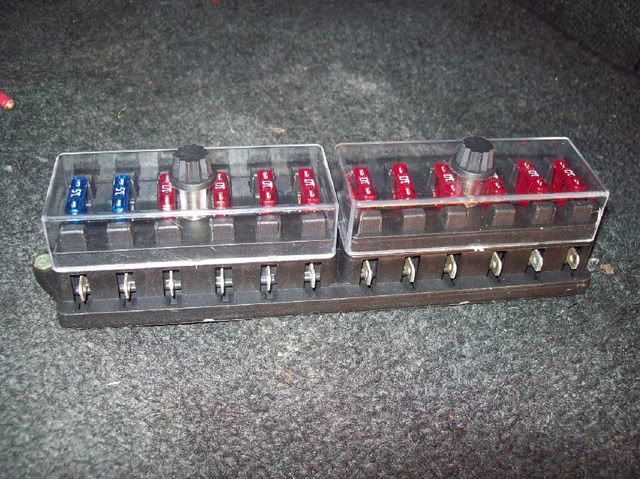
Oh yeah, here's the new fuse block:
Here's the serious problem, and the basic reason for swapping the fuse block:
Notice that red wire with the inline fuse plug sticking out the back? Yeah, that was connected to the melted fuse, and here's the problem:
Here are a bunch of the other burned up wires:
Here was the awesome power lines to the ignition coil:
Here's the wire to the electric choke on the carb (doesn't show how badly the line was exposed.) Not to mention all the other loose everything under the hood:
Oh yeah, here's the new fuse block:
-
Raze
Re: Burned wires, upgrading fuse box, DONE!
Finished crimping all the pigtails, and the new spade connectors. I also taped all the connectors up after finishing, here's the result:
Lettered side of the stock fuse box equivalent of the new one (butt connected wires together):
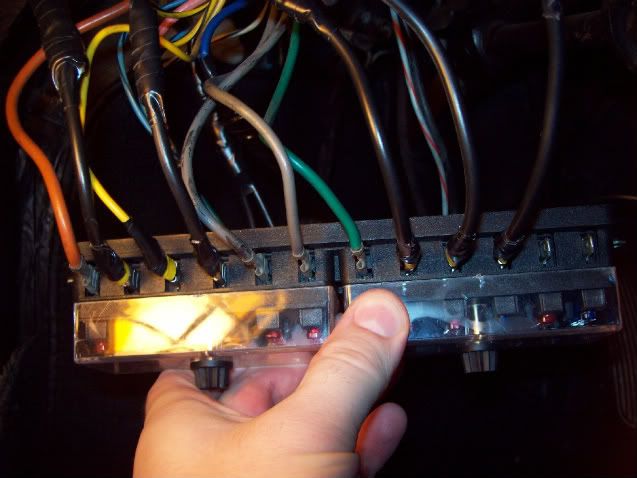
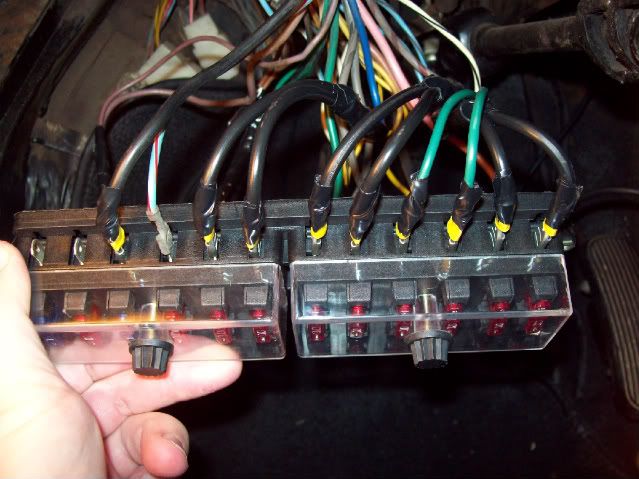
Numbered side of the stock fuse box equivalent of the new one (side with all the pig tails, the black wires are 10 ga, the green are 14 ga for the one white/black wire which is all alone on that side of the fuse):
Finally, I know the debate between crimping and soldering will go on long after I'm dead, and I'm younger than my car, but I did it all with crimping. And I know people complain about the crimpers I used as 'junk', but they worked just fine for me, in fact I will detail all the items needed to do this fix:
Fuse Block & Fuses:
(1) 12 position ATO fuse block from Wirthco:
(9) 10 Amp fuses
(1) 15 Amp fuse
Electrical Connectors and Wire:
(1) roll of electrical tape
(20) 10-12 ga female spade connectors
(5-10) 10-12 ga butt connectors
(10) 8 ga butt connectors
(10') 10 ga wire
(1') 14 ga wire
Tools:
Wire cutters
Scissors
Wire stripper/crimper
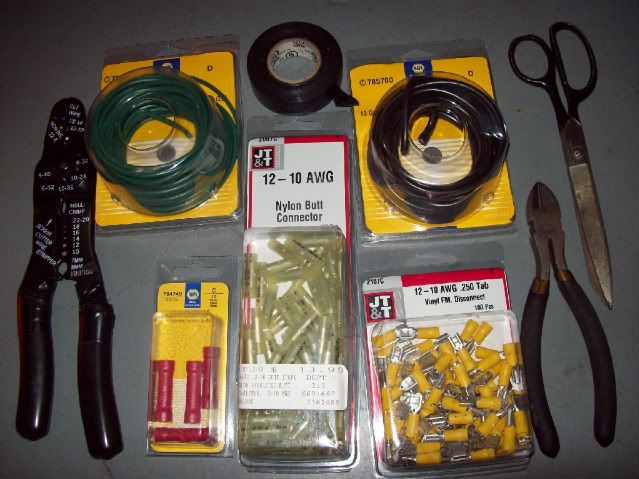
Total time to 'do the deed' was under 2 hours and very simple, I just had the door open sitting on a little creeper stool with the fuse block hanging loose.
I tested everything, and everything works, noticed the lights are a helluva lot brighter on low and high beam, wipers are still slow (gunked up, needs full dis-assembly), blinkers are slow, need to do the relay fix, starter turns over, ignition coil fires, fuel pump runs, radiator fan runs, interior blower fan runs, all position switches work, yeah haw!
Lettered side of the stock fuse box equivalent of the new one (butt connected wires together):
Numbered side of the stock fuse box equivalent of the new one (side with all the pig tails, the black wires are 10 ga, the green are 14 ga for the one white/black wire which is all alone on that side of the fuse):
Finally, I know the debate between crimping and soldering will go on long after I'm dead, and I'm younger than my car, but I did it all with crimping. And I know people complain about the crimpers I used as 'junk', but they worked just fine for me, in fact I will detail all the items needed to do this fix:
Fuse Block & Fuses:
(1) 12 position ATO fuse block from Wirthco:
(9) 10 Amp fuses
(1) 15 Amp fuse
Electrical Connectors and Wire:
(1) roll of electrical tape
(20) 10-12 ga female spade connectors
(5-10) 10-12 ga butt connectors
(10) 8 ga butt connectors
(10') 10 ga wire
(1') 14 ga wire
Tools:
Wire cutters
Scissors
Wire stripper/crimper
Total time to 'do the deed' was under 2 hours and very simple, I just had the door open sitting on a little creeper stool with the fuse block hanging loose.
I tested everything, and everything works, noticed the lights are a helluva lot brighter on low and high beam, wipers are still slow (gunked up, needs full dis-assembly), blinkers are slow, need to do the relay fix, starter turns over, ignition coil fires, fuel pump runs, radiator fan runs, interior blower fan runs, all position switches work, yeah haw!
-
NGinuity
Re: Burned wires, upgrading fuse box, need help...
You appear to have gone to Fry's electronics! That place is like the Disney Land of electronics stores.
Just FYI, if you anticipate doing this on a regular basis (I rewire and do audio installs on the side all the time), consider buying all of your connectors from MCM Electronics in bulk. They run about 10 bucks per hundred of just about everything.
I'm going to put in my two cents here, because I've been doing this a really long time (audio and automotive wiring since before I could even drive). Long enough to see the track record of my work, what comes back for repair, what doesn't show up ever again. Please take it as no more than friendly advice, and in no way am I trying to make light of your tremendous accomplishment here. As long as you're happy with your car, I am totally happy for you.
I know it's heavily debated in regard to solder versus crimp, but the real reason we do that as opposed to crimping is not because we're afraid of what we'll do to the connection, but what air does to the connection. Oxidation is a real bad enemy of wiring, and you don't have to do anything for it to cause harm on it's own. Solder shields the connection from the air as well as makes the best electrical and mechanical bond, and heat shrink shields you and the solder from the bare solder joint. Most people don't know that one of the real reasons for heat shrink is to keep air away from the flux residue sitting on the surface of a solder joint and flux is corrosive. The last thing you want is oxidation on the crimped mechanical connections to hinder the flow of current in a car that has really bad wiring in the first place. My trick is to take the crimp connectors, and a pair of pruning shears, slice the insulation of the crimp down to bare metal up to 2mm from the top of the metal base, tin the tip of my wire with the soldering gun (a lot faster than an iron), put my connector on, crimp tightly, then heat connector to get the solder to bond. Go over that with heat shrink and you're bulletproof. It takes longer, but you only have to do it once, and you'll never second guess that connection again. Crimps are considered temporary for power transmission applications where there is a high current demand. A fuse block is pretty permanent.
On the note of the crimpers, the reason people suggest "better than bottom of the line" is because of the surface area they crimp. With the ones you have, a crimp will certainly work, but the amount of the connector that is being bonded to the wire is actually very small in area. With even a small upgrade to the GB series (my road bag uses these because my Klein's have been stolen twice), it's a significantly better bond than the small crimp those will do. Will they work? Yes. Will they work for a long time? Probably not. You want to crunch as much connector as you can around that wire, because it lessens your chances of oxidation (mentioned above) on the connection and eventual mechanical failure. Oxidation = resistance = heat = fire = ack my car.
-
Raze
Re: Burned wires, upgrading fuse box, need help...
Yup, Frys alright and I wasn't really planning on buying so much, just happened that it wasn't really expensive and I figured it would be nice to start building up my electrical kit, and you're right it's good but nothing like ACK Industrial down near Georgia Tech where we used to get supplies when I was in gradschool, that place literally had everything or could get it, kinda like the mcmaster-carr of electronics...
I totally agree on soldering and heatshrink since, as you've said, it's much more permanent. Honestly my soldering skills are poor and I wanted the job done fast, not fancy, if I was going to do that, I would have re-wired the entire harness with weather pack connectors and a mini-ATO fuse block since I don't like reusing 38 year old wiring anyway, and most likely it will all need to come out inside of the next 5-10 years.
Since I bought this car as a low $ project (I'm working on getting ready for the $2011 Grassroots Motorsports Challenge where the total cost of the vehicle must be at or under the year's dollar amount) and the fuse block was all melted not holding good contact between many of the circuits even after cleaning, I decided to get something that was safer and worked as a priority with aesthetics or attention to detail second.
As for the crimpers, yup, I basically ended up crimping each side multiple times to get really good clamping, I wasn't able to pull any out and I tried as I went, so I'm happy with the connections for now, but my hand hurts and a better set of crimpers would have been nice, but again, it worked, it was cheap, it was easy.
-
NGinuity
Re: Burned wires, upgrading fuse box, need help...
Once you start soldering those things, it will eat at you and eat at you if you don't do it that way from now on... HAH! Especially if you are as Type A as I am. Of course, being so Type A, I likely shouldn't be working on Fiat's 