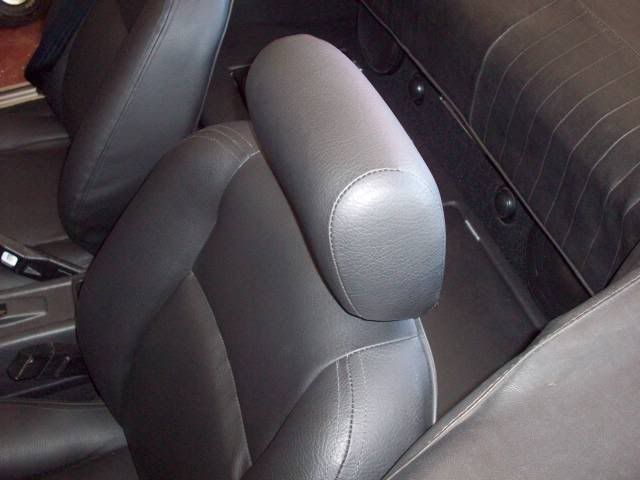
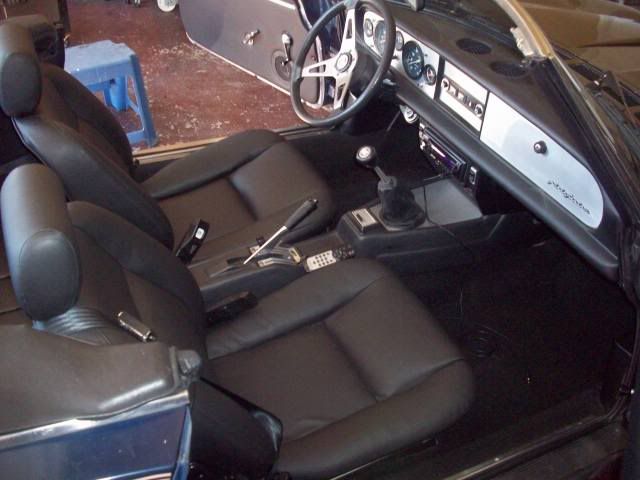
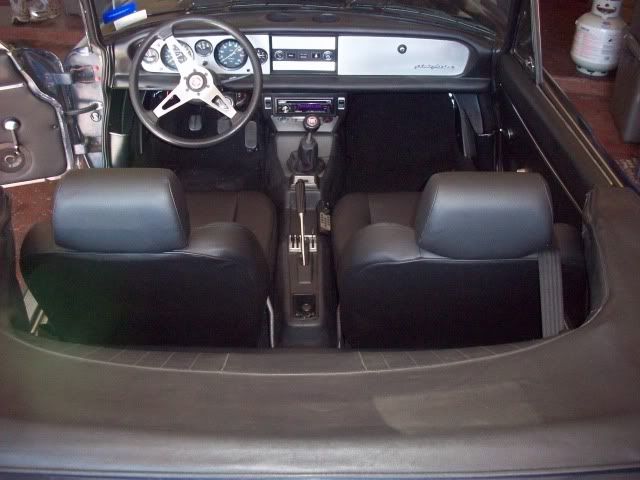
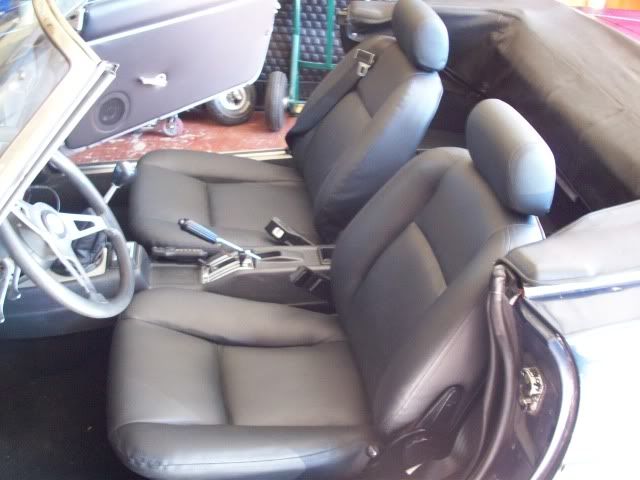
Interior – Before & After
- TulsaSpider
- Posts: 1547
- Joined: Tue Apr 29, 2008 7:33 pm
- Your car is a: 1978 Spyder 124 2L
- Location: Tulsa, Ok
Re: Interior – Before & After
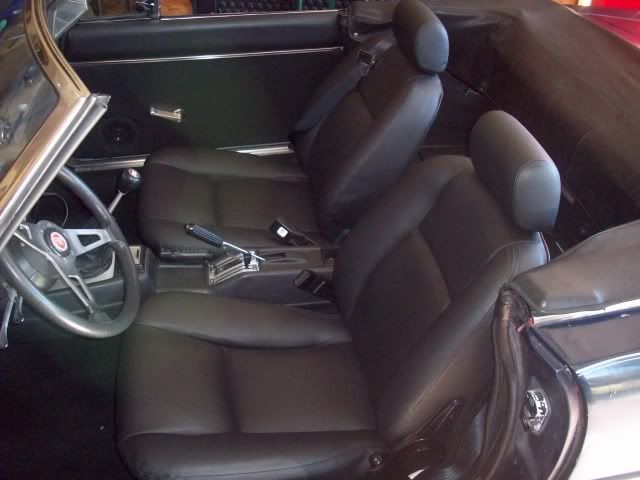
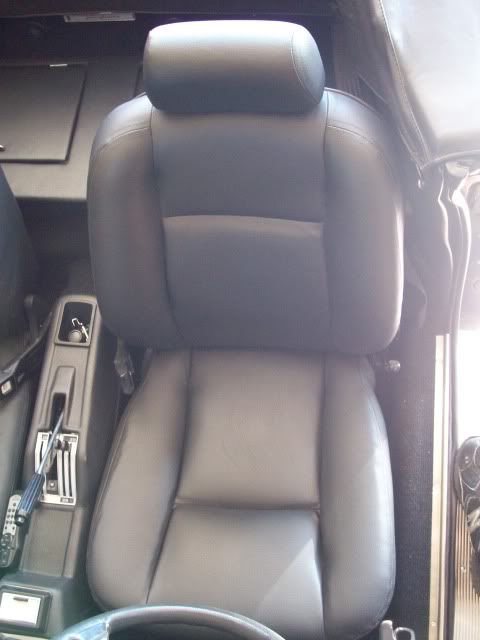
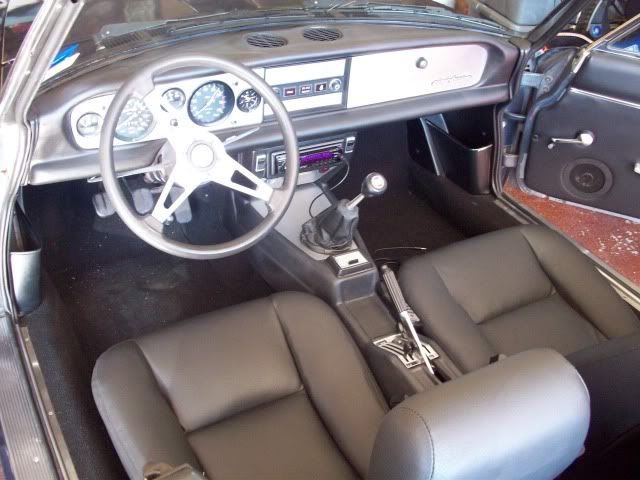
That is a great looking interior! Wow! I would love for mine to look like that!
1978 Spyder 1800 make that 2L! Finally making real progress!
-
grittracing
Re: Interior – Before & After
not sure I think i like your dash better than what i did. it seems your as a lot less glare. I knock a lot of mine down with the turning but I think you have the better idea. great job


-
radiopilot
Re: Interior – Before & After
Rick... EXCELLENT JOB!!! 
Very nice work and looking great... are the door panel sides same color as the seats?
You see it wasn't as hard as many think... I see you too had a little trouble on the curves and caused some wrinkling but it will go away in time as it gets worn in... my car and my son's car also had this dilema so it must be inherent in all sewn up seats (I used a heat gun/hair blower to smooth out the wrinkles)... but again your seats look great... now reupholster that dash and radio/center console!

Where are your door handles to match? Are they removed from the car? They can be recovered also.
Nick
Very nice work and looking great... are the door panel sides same color as the seats?
You see it wasn't as hard as many think... I see you too had a little trouble on the curves and caused some wrinkling but it will go away in time as it gets worn in... my car and my son's car also had this dilema so it must be inherent in all sewn up seats (I used a heat gun/hair blower to smooth out the wrinkles)... but again your seats look great... now reupholster that dash and radio/center console!
Where are your door handles to match? Are they removed from the car? They can be recovered also.
Nick
- Redline
- Posts: 631
- Joined: Sat Aug 29, 2009 4:34 pm
- Your car is a: formerly a 1971 Fiat 124 BC Coupe
- Location: Switzerland
Re: Interior – Before & After
Maybe I missed it (I think I read carefully), but what material is that and did you sew on a normal machine, or an industrial one? Looks great.
http://www.124bc.com
La Dolce Vita: Joy and frustration at the speed of smoke
La Dolce Vita: Joy and frustration at the speed of smoke
-
Foster48x
Re: Interior – Before & After
Nick,
Thanks. Yes the door panels, seats, and rear shelf are all the same fabric. Your right, it wasn't that difficult just time consuming since it was my first time. I did have a few areas that need to be smoothed out but most are on the passenger seat and due to the added foam glued to the unholstery. If they don't smooth out on their own I'll fix it next time I have the seats out. I've decided to leave the arm rests off. I like the smooth uncluttered look of the door panels without them.
Redline,
The whole interior is done in black Whisper Vinyl. It's very durable and looks allot like leather. I sewed the seats using a 1960's Singer 223 that I picked up on Ebay for $70 shipped after learning to sew on one like it that I borrowed from my mother-in-law. With the right needles and thread it will sew through most fabrics including leather.
This is a random pic of one like mine.
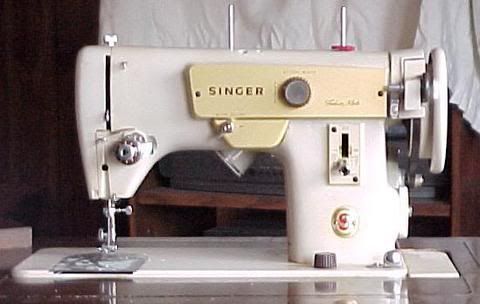
Rick
Thanks. Yes the door panels, seats, and rear shelf are all the same fabric. Your right, it wasn't that difficult just time consuming since it was my first time. I did have a few areas that need to be smoothed out but most are on the passenger seat and due to the added foam glued to the unholstery. If they don't smooth out on their own I'll fix it next time I have the seats out. I've decided to leave the arm rests off. I like the smooth uncluttered look of the door panels without them.
Redline,
The whole interior is done in black Whisper Vinyl. It's very durable and looks allot like leather. I sewed the seats using a 1960's Singer 223 that I picked up on Ebay for $70 shipped after learning to sew on one like it that I borrowed from my mother-in-law. With the right needles and thread it will sew through most fabrics including leather.
This is a random pic of one like mine.

Rick
Last edited by Foster48x on Tue Nov 09, 2010 12:26 pm, edited 1 time in total.
-
Fiat88
Re: Interior – Before & After
Rick were you a upholsterer in your past life. Damn good work!Foster48x wrote:Well guys I finally finished reinforcing my seat backs (no more gansta lean) and sewing new upholstery for my 80FI. Considering my amateur welding and sewing skills I’m pretty satisfied with the results. Let me know what you think.
Rick
-
Foster48x
Re: Interior – Before & After
Seat Back Reinforcement
This is for the few of you that have asked how I reinforced my seat backs.
What you’ll need…
Die Grinder
Cut Off Wheel
Welder
½ ID Black Pipe
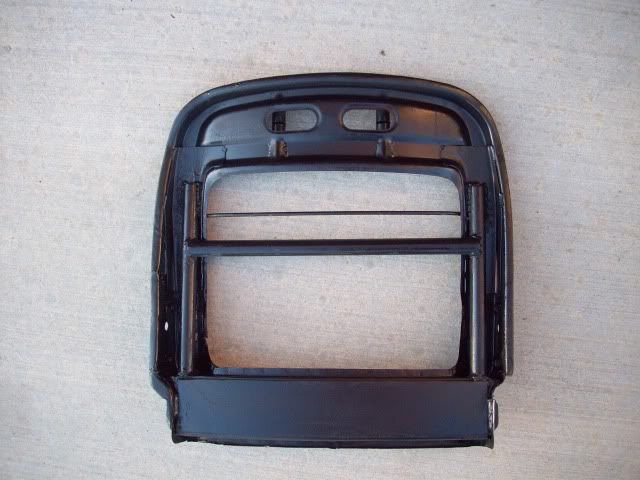
After taking the seats apart and surveying the damage I got the seat as straight as possible by bending it back in shape. I found that placing it on top of a 2x4 (shown as the yellow line in the pic) and standing on opposite corners of the seat I was able to get it bent back almost perfectly straight. If your seat was as bent as mine, which it probably is, you’ll need to hammer and straighten a few areas before you start welding.
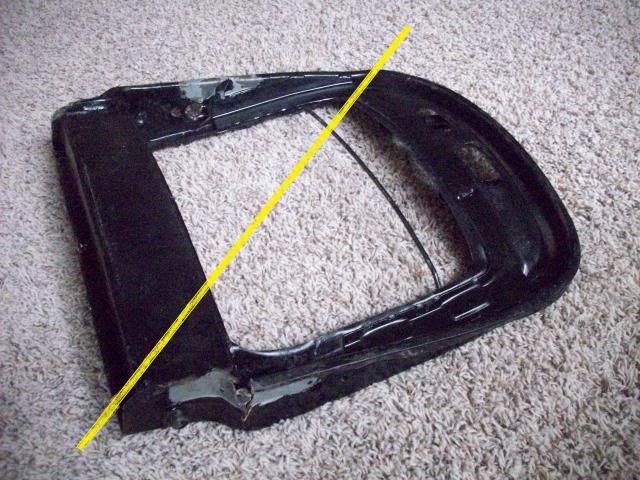
Next, I busted out the welder and welded all of the torn metal. Sorry I didn’t take any pics of the welding in this area. Look very closely at the entire seat frame. I found some hairline cracks on mine that could have possibly led to problems in the future.
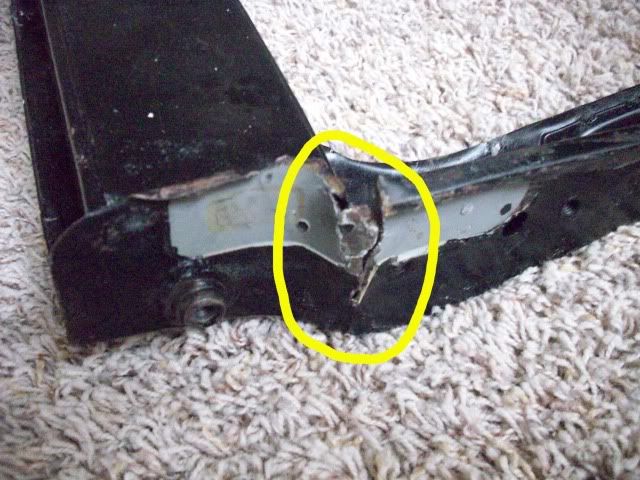
Circled on the right of this pic was a pretty bad tear that had to be welded. To the left is the area where the two bolts hold the upper and lower seat bracket. The area was bent badly enough that the bolt had separated from the frame. To reinforce this area I welded in a steel plate over the whole area re-cut the holes and welded the bolts back in.
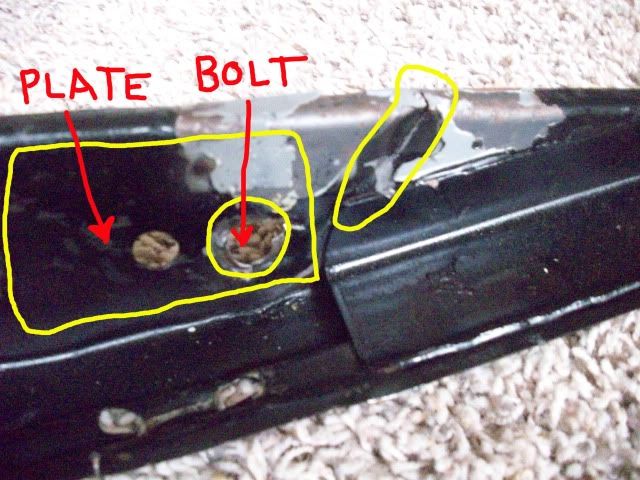
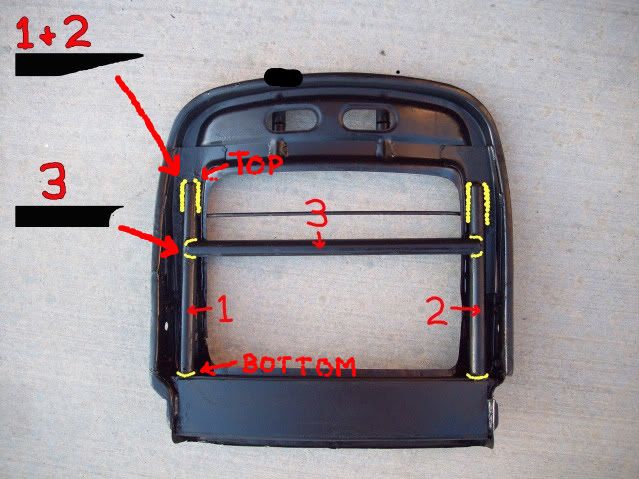
Here’s what’s going to keep the seat from ever going back to the “gangster lean”. The reinforcement is made from ½ ID black pipe from Home Depot. I bought 10ft of it.
First I cut the pieces labeled 1 & 2 (Sorry I didn’t take measurements of how long each piece was after it was cut) and angled one end like the example in the top left corner of the pic. I cut the pipe a little bit longer than what I would need just in case my angle cutting job wasn’t perfect. Once I got the angle perfect I cut the bottom so it would lay flush on the seat frame. I welded in piece 1 & 2 (Yellow on the pics are where it was welded). Lastly I measured out pipe 3, cut each end in a crescent like the example on the left and welded it in.
If you need any more details let me know. For you guys that have asked I’m also working on a write-up of how my upholstery was constructed. It should be done soon.
Rick
This is for the few of you that have asked how I reinforced my seat backs.
What you’ll need…
Die Grinder
Cut Off Wheel
Welder
½ ID Black Pipe
After taking the seats apart and surveying the damage I got the seat as straight as possible by bending it back in shape. I found that placing it on top of a 2x4 (shown as the yellow line in the pic) and standing on opposite corners of the seat I was able to get it bent back almost perfectly straight. If your seat was as bent as mine, which it probably is, you’ll need to hammer and straighten a few areas before you start welding.

Next, I busted out the welder and welded all of the torn metal. Sorry I didn’t take any pics of the welding in this area. Look very closely at the entire seat frame. I found some hairline cracks on mine that could have possibly led to problems in the future.

Circled on the right of this pic was a pretty bad tear that had to be welded. To the left is the area where the two bolts hold the upper and lower seat bracket. The area was bent badly enough that the bolt had separated from the frame. To reinforce this area I welded in a steel plate over the whole area re-cut the holes and welded the bolts back in.

Here’s what’s going to keep the seat from ever going back to the “gangster lean”. The reinforcement is made from ½ ID black pipe from Home Depot. I bought 10ft of it.
First I cut the pieces labeled 1 & 2 (Sorry I didn’t take measurements of how long each piece was after it was cut) and angled one end like the example in the top left corner of the pic. I cut the pipe a little bit longer than what I would need just in case my angle cutting job wasn’t perfect. Once I got the angle perfect I cut the bottom so it would lay flush on the seat frame. I welded in piece 1 & 2 (Yellow on the pics are where it was welded). Lastly I measured out pipe 3, cut each end in a crescent like the example on the left and welded it in.

If you need any more details let me know. For you guys that have asked I’m also working on a write-up of how my upholstery was constructed. It should be done soon.
Rick
-
donerehart
- Posts: 344
- Joined: Fri May 14, 2010 9:29 pm
- Your car is a: 1976 spider
Re: Interior – Before & After
Rick,
Any progress on the write up of your upholstery? We are going to give it a try!
Don Erehart
Any progress on the write up of your upholstery? We are going to give it a try!
Don Erehart
76 Spider
St. Louis, MO
St. Louis, MO
-
Foster48x
Re: Interior – Before & After
Sorry for the wait guys I've been extremely busy. I'm about half way through the write up on my upholstery. A couple more days and I should have it done and posted.
Rick
Rick
-
spiderrey
- Posts: 2623
- Joined: Sat Jan 28, 2006 2:08 pm
- Your car is a: 70 124 spider-74x19-03 ranger edge
- Location: San Dimas, Ca
Re: Interior – Before & After
Very impressive.
-
azygoustoyou
Re: Interior – Before & After
Hey Rick,
Interior looks great. I'm doing mine soon. Looking forward to your write up dealing with seams and all. I already have the patterns.
Interior looks great. I'm doing mine soon. Looking forward to your write up dealing with seams and all. I already have the patterns.
-
Foster48x
Re: Interior – Before & After
Sorry again for the wait guys…
Here’s what I have together so far on my Upholstery Build. As time permits I’ll add to it and hopefully finish it up soon.
Rick
My DIY Upholstery
MATERIALS
• Sewing Machine – My machine is a late 60’s early 70’s Singer 223 that I picked up on EBay for around $75 shipped. It will easily sew multiple layers of vinyl.
• Vinyl - I used Whisper Vinyl from JoAnn Fabrics. It’s durable and looks allot like leather. If you shop at JoAnn’s make sure you download one of their 40% off coupons (They also take Hobby Lobby coupons). I can’t remember how much I actually used for the seat. I had leftovers from other projects so I’m not really sure. My advice would be to lay it out like I have it in the pic below and measure the over all length and width you’ll need. Don’t forget you’ll also need extra for the head rests and long strip for the piping on the back of the seat.
• ½ Foam Padding (Green) - From JoAnn Fabrics. I think it runs about $10 a yard at JoAnn’s so having another 40% off coupon handy will help.
• Coat Hangers – Cheap wire hangers from Wal-Mart. The ones wrapped in white plastic that run a couple of bucks.
• Mini Bungee Cords – They come in 8 Packs at Home Depot
• Jean needles for the sewing machine
• Regular Upholstery Needles or just some larger needles
• Seam ripper
• Thimble (Get one. If you don’t you’ll wish you had one when you start to hand sew the plastic trim)
• Flexible measuring tape
• Good straight edge
• Good pair of scissors – I also bought a scissor sharpener from Wal-Mart to keep the scissors nice and sharp.
• PeelnStick Fabric Fuse Permanent Adhesive Rolls – It’s about $3 at Wal-Mart and I think I used 2 rolls of it.
• Bias Tape – It’s the black cloth for the back side of the double stitch – It’s cloth trim that looks kind of like ribbon (it’s not ribbon though) you can get in different widths. I think I got it in 1 inch width. It’s also in the sewing section at Wal-Mart.
• Nylon upholstery thread – 94 cents at Wal-Mart. I think I went through at least 2-3 rolls of it.
• Spray Adhesive – I used the 3M
• Masking Paper and Tape (Optional)
• Wire snips
• Needle nose pliers
• Couple of good Sharpie’s (Pens)
• One thing I was going to buy but ended up not needing was hog rings (I think that’s what their called). They’re only used on the bottom of the seat back and I really didn’t find them necessary.
• Last but not least you’ll need allot of free time, patience, blood, sweat, and maybe a few tears
I’m sure I’m leaving something out. If you notice anything missing from the list let me know and I’ll add it.
BEFORE YOU GET STARTED
If you’re a noob like me and not familiar with the different sewing techniques I would spend a little time researching them before you begin. I found a bunch of good YouTube videos on the internet of the different types of stitches that really helped. I also did allot of practice runs on the vinyl I used to get my machine set up with the perfect thread tension and stitch width. Most importantly, take some extra time to practice the double stitch since it’s the one stitch on the seat that’s visible. The quality of that stitch will be the difference between upholstery that looks amateur and upholstery that look professional.
STEP 1 – Ripping the Seams
Pick the seat in the best condition; usually it’s the passenger seat. Remove the upholstery from the frame and inspect it to ensure you can get good templates from it. If they’re good start ripping the seams and stitching on the plastic trim with the seam ripper. Remove all of the padding from the backs of the upholstery. Set the 3 plastic trim pieces and the piping that runs around the back of the seat aside (It’ll be recycled). Once the panels are apart mark their locations on the back. On some of the pieces it’s best to mark the orientation of the piece since some of the square panels are tapered just a bit. If you plan on dividing the center seat back and seat bottom panel like I did now would be the time to cut those pieces in half and mark their location and orientations also.
STEP 2 – Creating the Template
Once you have all of the seams ripped trim the templates down to the original factory stitch line (Don’t cut on the double stitch line or the template will be too small). Doing so will give you the exact size of the panel needed without the excess material messing with the shape. If you trace the template with the excess material; it will make it difficult to get the seams lined up and the pieces sewn together straight. After the pieces were traced on to the vinyl I added a predetermined measurement around each template which I’ll explain later.
STEP 3 – Tracing the Template
Lay out the pieces and trace them with the sharpie onto the back of the vinyl. If the original seat upholstery is too warped and hardened from age heating it with a heat gun or hair dryer will soften it up enough to flatten it out. If that doesn’t work you could probably take an iron to it. I know this will sound like a no brainer but make sure you have the backs of the pieces facing up on the back of the vinyl. I made that mistake cutting my carpet templates and a whole set came out backwards. Marking the holes for the bolts and headrest really isn’t necessary. Those holes can be made once the upholstery is finished and fitted on the seat frame.
STEP 4 – Adding Fabric around the Circumference of the Template
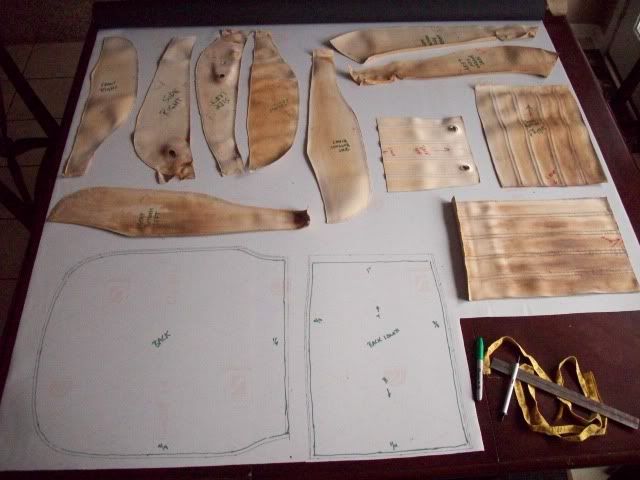
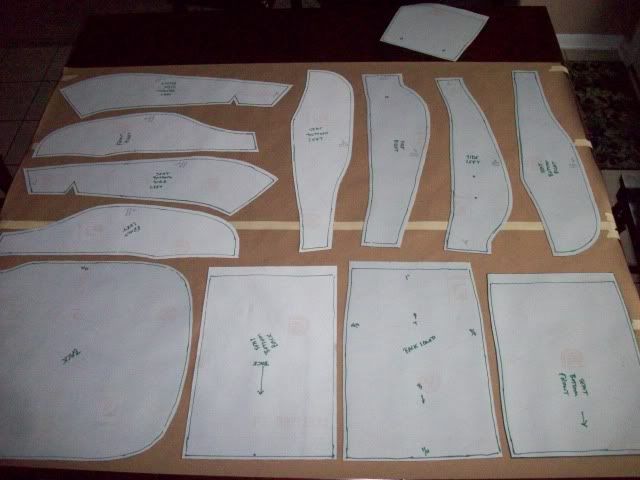
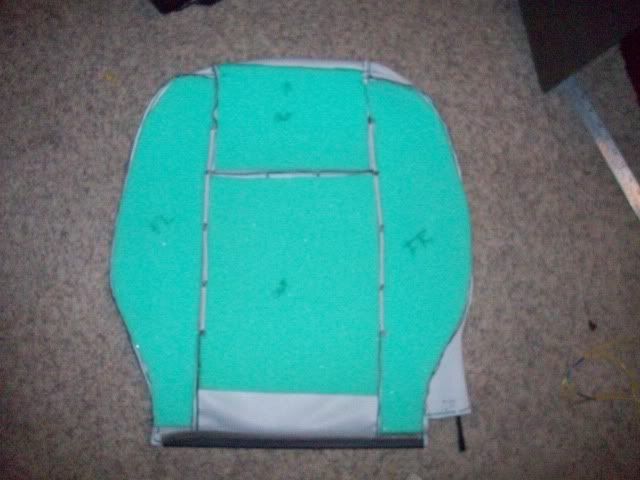
This part is a little time consuming but worth the effort when you start to sew the panels together. Explaining it is a bit difficult in text so if you have any questions about this part let me know and I’ll try to go into as much detail as possible. Reason being, this is where you’re going to add the additional measurements around each piece and if you botch it you’ll end up having to trash allot of fabric. In the pic below all of the cut pieces have been traced on to the fabric using a thicker green sharpie. This is the inside line that you’ll actually sew on. The thinner line around each traced piece is the amount of fabric you’ll add to each panel to help you keep them aligned or extra to perform the double stitch technique. This outside line (the thinner one in the pic) is the one you’ll use to cut out the panel. There are also a few pieces that have an inch or so added to them that will be used on the inside of the seat to hold the wire that keeps the upholstery snug to the seat.
Here’s what you’ll need to add to each piece:
* Add 3/8 ths of an inch to the side of any piece that will be double stitched. Not around the whole piece just the side to be double stitched.
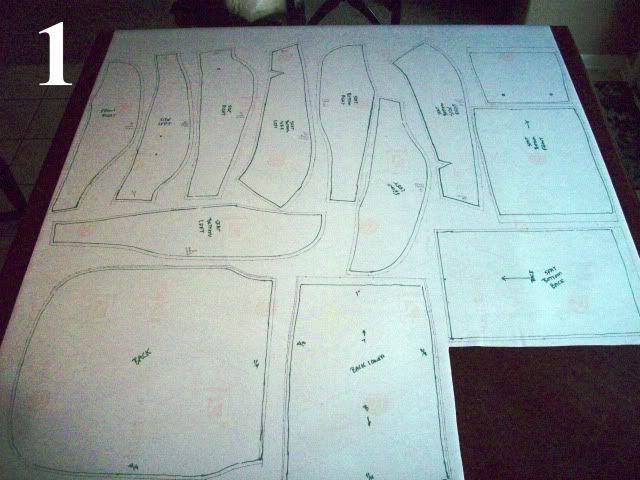
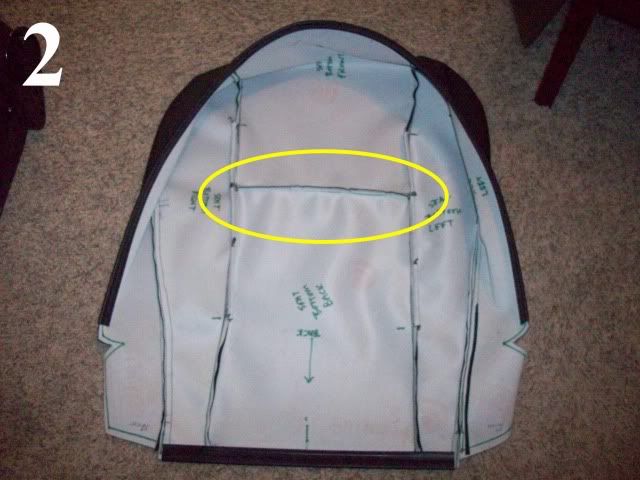
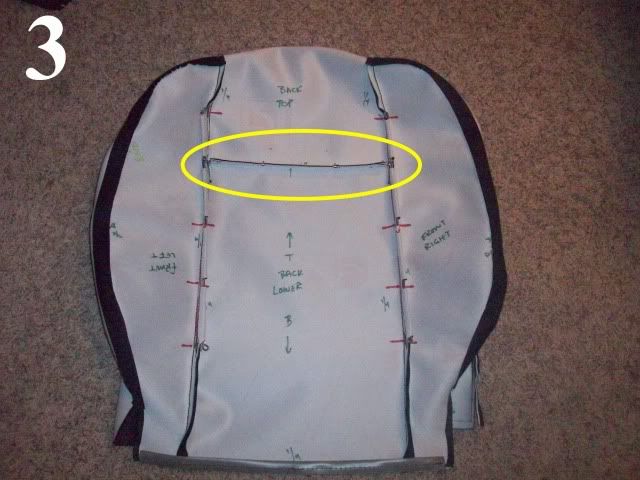
* Add 1 inch to the four pieces that make up the center seat back and center seat bottom. These are the panels that I split which will also house the wire hanger. Don’t add it to the entire piece just the sides circled in pic 2 and 3 below.
* Add ¼ inch around everything else.
STEP 5 – Back-Up Templates (Optional)
I wanted to keep a back up set of templates to use at a later date if I need them without having to keep the old crap seat upholstery. So I transferred the vinyl cutouts over to masking paper. If you don’t want an extra set of templates and you’re going to do both of your seats at the same time you can skip this step.
I did this for another reason also. I started the upholstery on my passenger seat and then waited a week or so before I got to my drivers seat. So I could exactly match the templates for both seats I transferred the already cut templates over to masking paper before I started sewing them. Then I cut the templates from the masking paper and copied them over to the vinyl for the second seat once I corrected a few mistakes that I had made on the first seat. It was easier and more accurate than using the original factory upholstery pieces that are difficult to lay flat. But if your doing both seats at the same time and you think the templates are pretty accurate you could just take the cut vinyl templates and copy them onto another sheet of vinyl before you start sewing them together. I didn’t get my first set perfect the first time around so I’m glad I didn’t waste the time transferring the first set onto the vinyl for the second seat.
STEP 6 – Sew the Panels
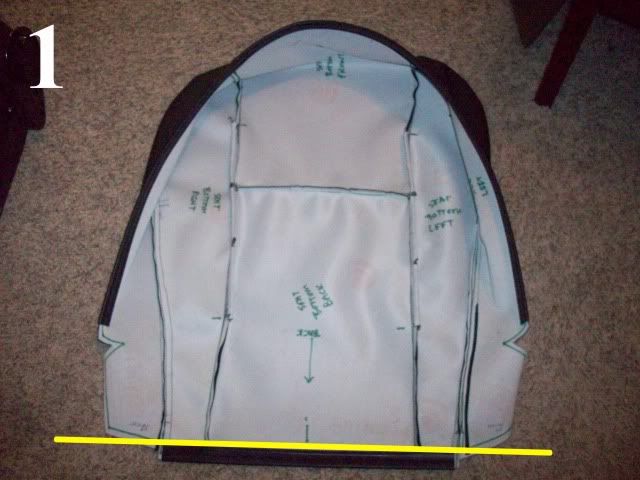
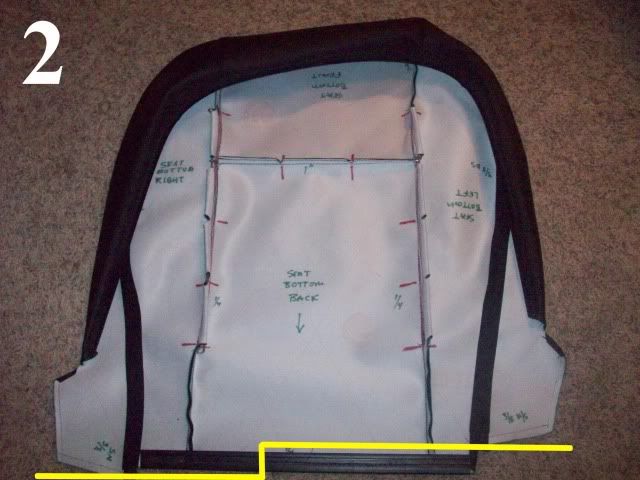
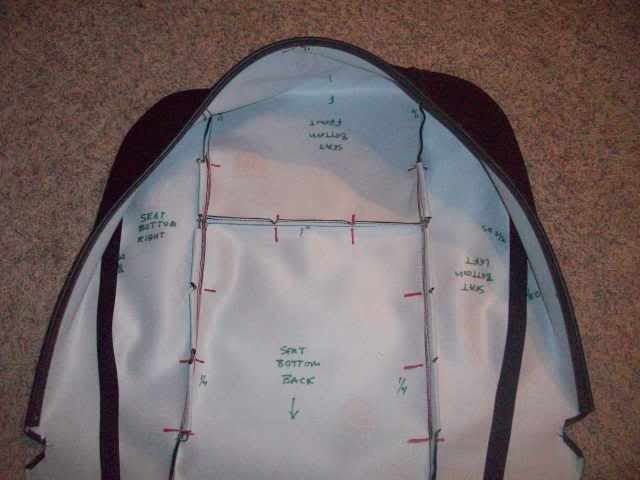
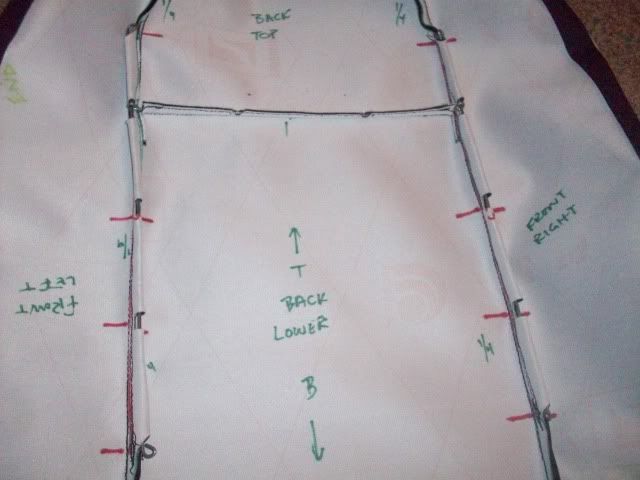
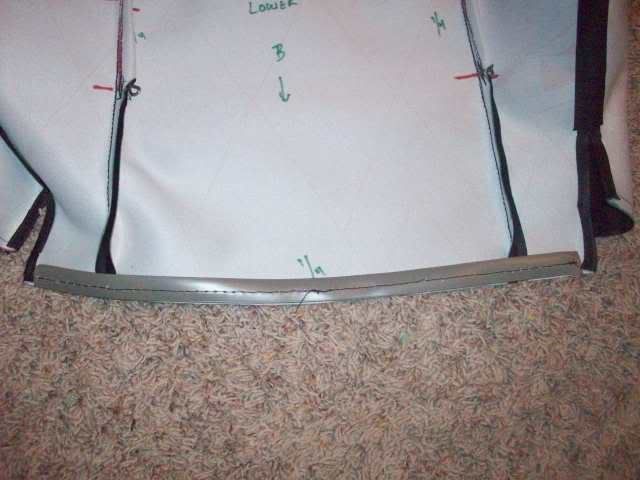
Just a tip before you start sewing the panels together: If you use the same vinyl fabric I used be cognizant of the fact that it will stretch and contract some depending on the sewing techniques you use. Notice in the second pic below how the left side panel is lower than the right. The tops of those panels are aligned perfectly however when I started sewing I must have stretched out the left panel more than the right. You can see in pic one (which is the first seat I did) that both sides came out even.
Start with the Seat Bottom.
1st – Sew panel 1 to panel 2 with a single stitch. I actually did multiple passes on all of the stitches to reinforce all of the seams.
2nd – Sew panel 3 to panel 4 and panel 5 to panel 6. First single stitch both to make sure the panels are lined up correctly. Once you get them perfect double stitch the seams before going any further.
3rd – Sew both outer panels 3, 4, 5 & 6 to the sides of panel 1 and 2.
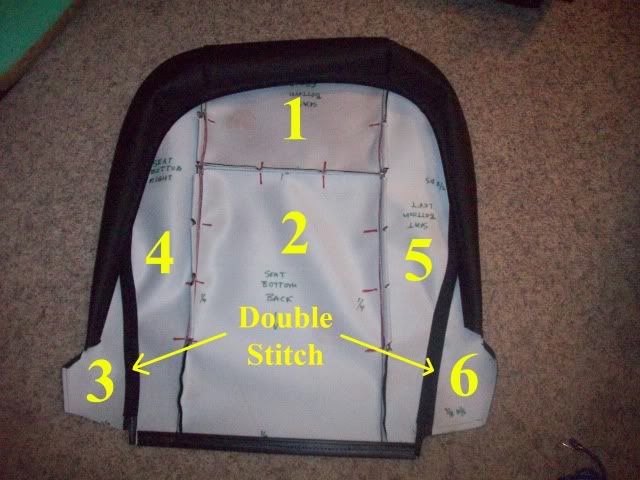
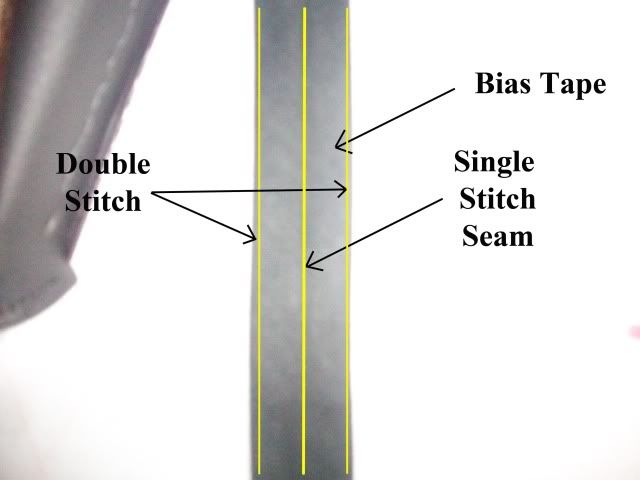
Here are some details on the double stitch technique I used. First perform a quality single stitch (like I said before I did multiple passes on all of my single stitches). Then fold the excess 3/8” of fabric over on the back side and use some of the adhesive tape to hold it spread in place. Then put a piece of adhesive tape all the way down the seam and put the Bias Tape over it. Once you have all in place double stitch the seam. Note: Try to keep all of the adhesive tape under the Bias Tape so it doesn’t hang up your fabric while going through the sewing machine. Sorry I didn’t take any pics of this part of the process. If there’s interest I may try to recreate the process at a later date with pics.
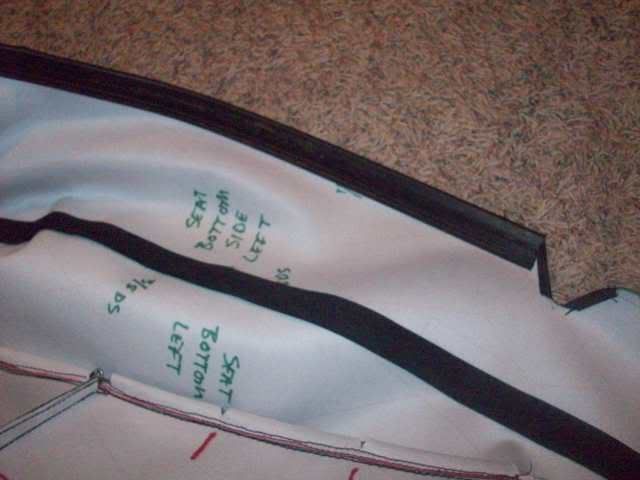
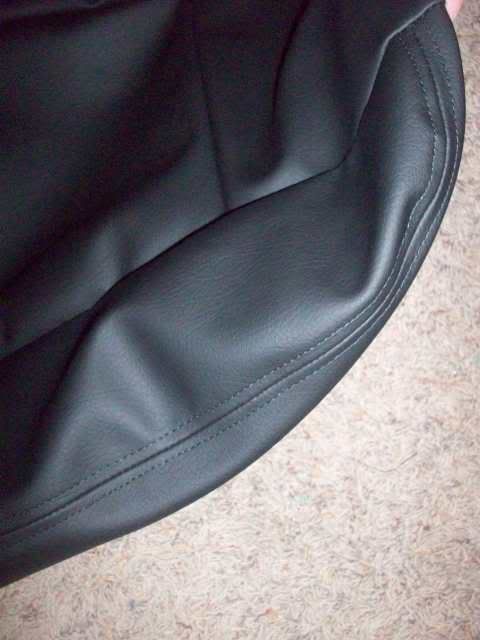
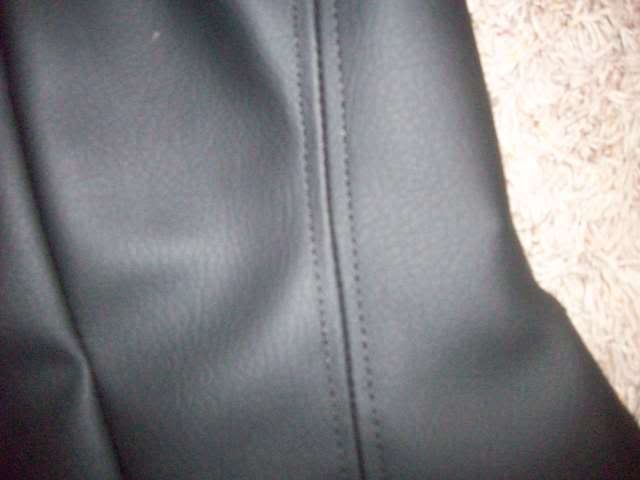
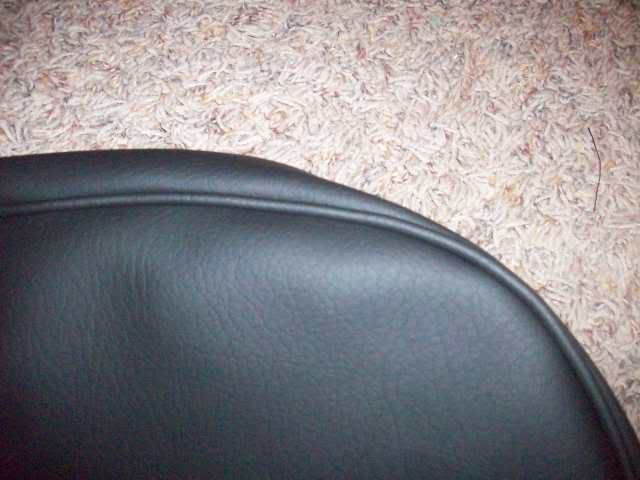
Sorry that’s all I have together right now. Here are some more pics to keep you busy until I have time to finish the rest of the write-up.
Rick
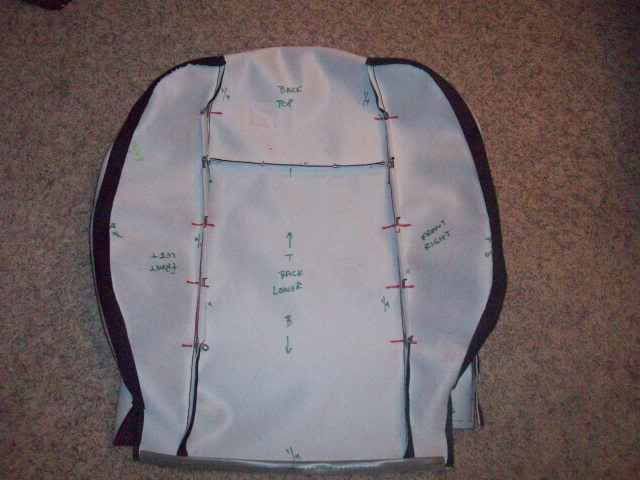
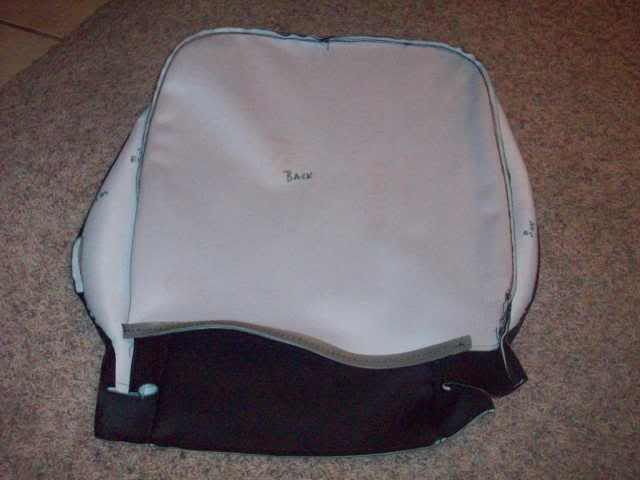
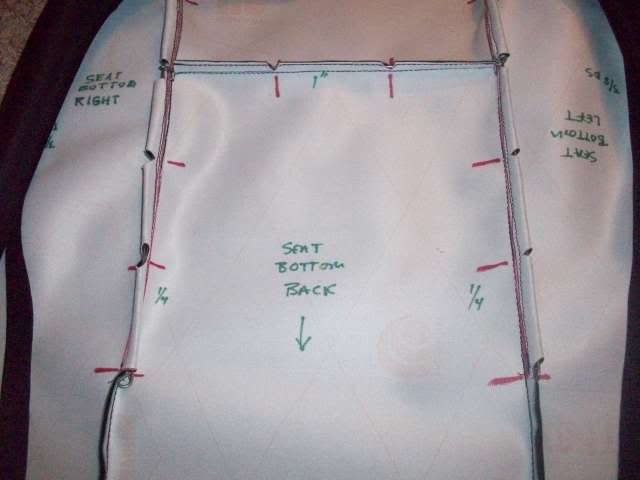
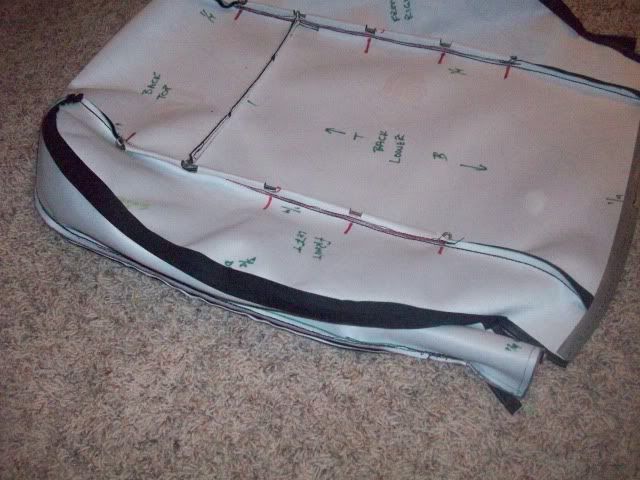
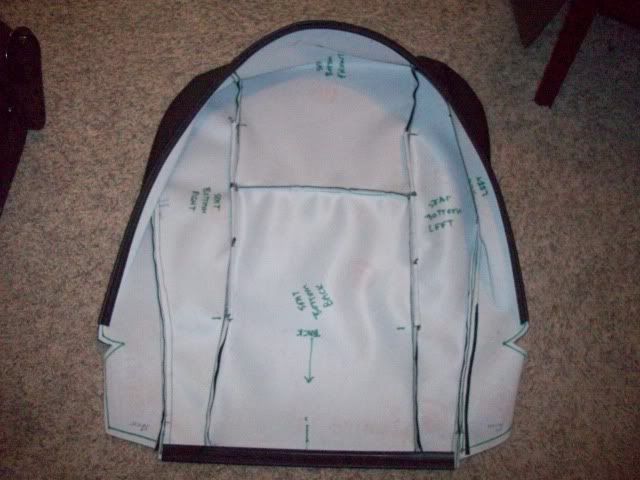
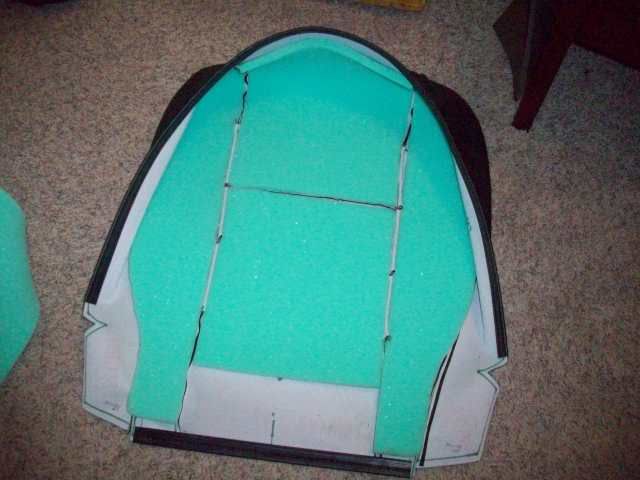
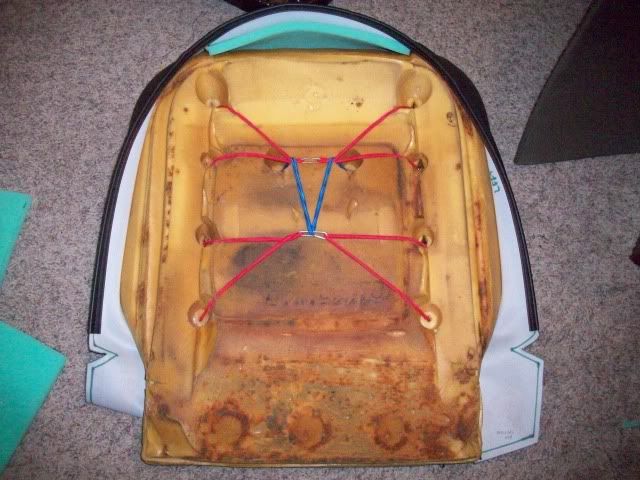
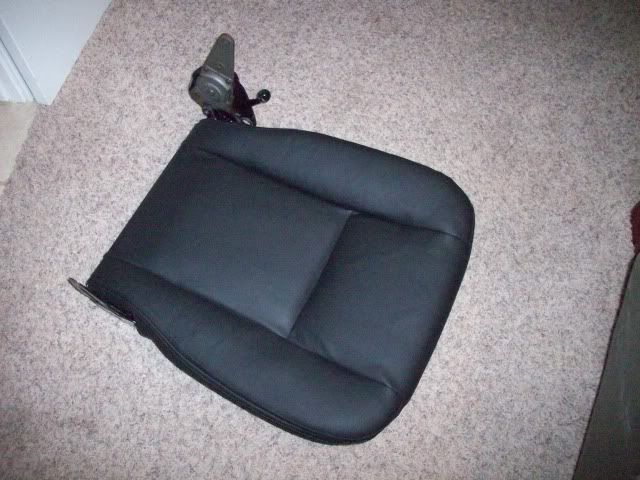
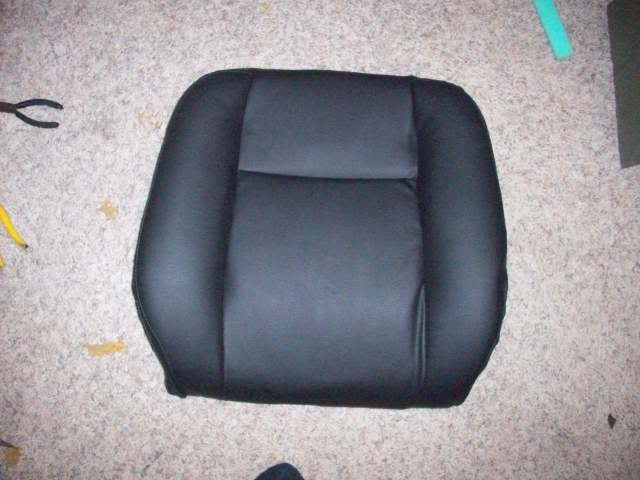
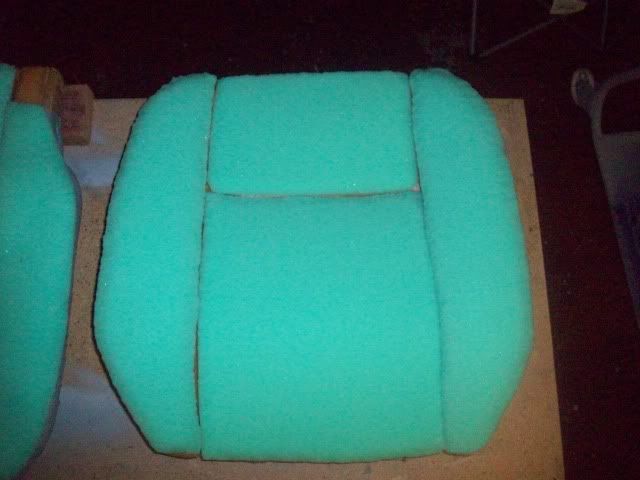
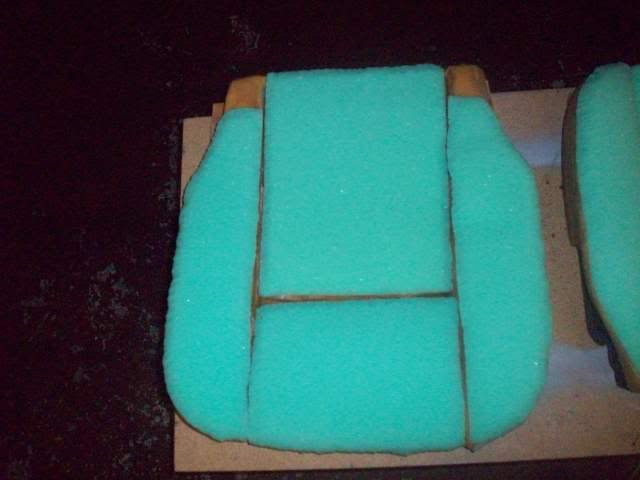
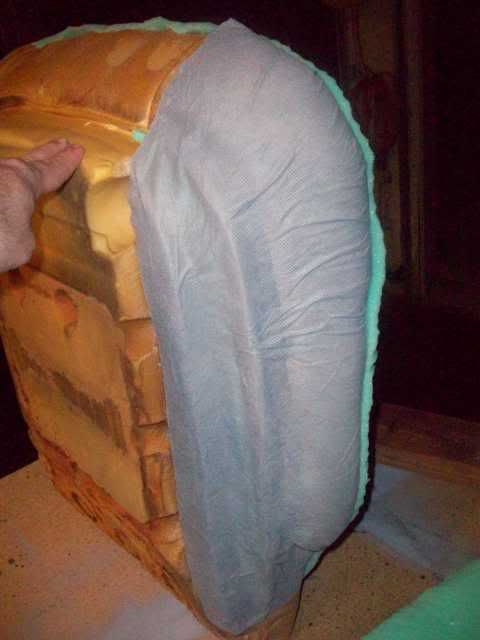
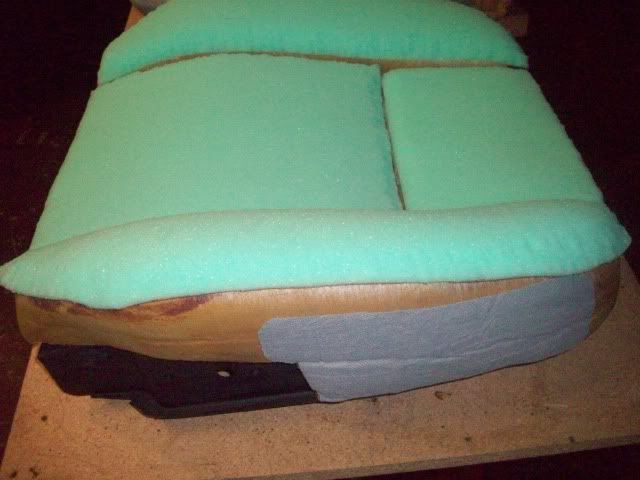
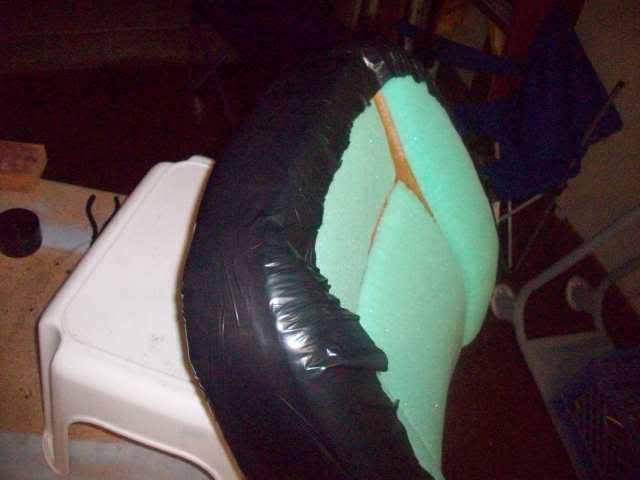

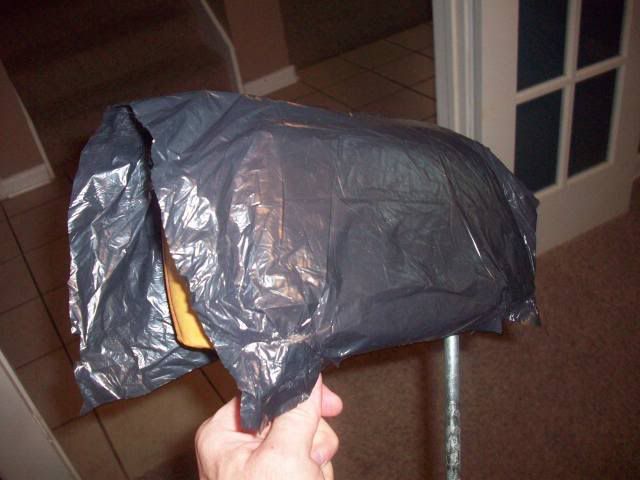
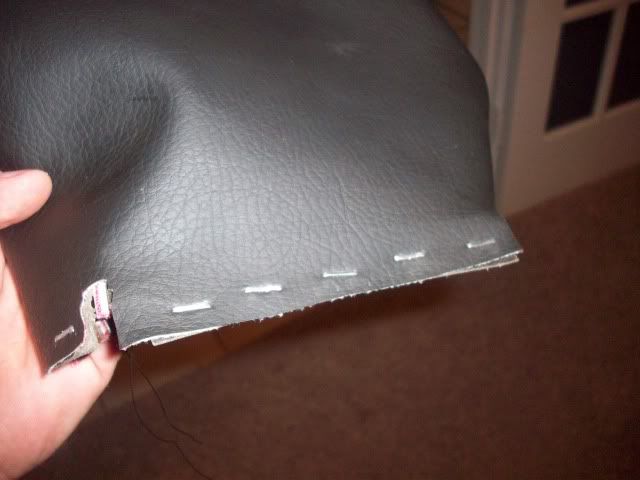
Here’s what I have together so far on my Upholstery Build. As time permits I’ll add to it and hopefully finish it up soon.
Rick
My DIY Upholstery
MATERIALS
• Sewing Machine – My machine is a late 60’s early 70’s Singer 223 that I picked up on EBay for around $75 shipped. It will easily sew multiple layers of vinyl.
• Vinyl - I used Whisper Vinyl from JoAnn Fabrics. It’s durable and looks allot like leather. If you shop at JoAnn’s make sure you download one of their 40% off coupons (They also take Hobby Lobby coupons). I can’t remember how much I actually used for the seat. I had leftovers from other projects so I’m not really sure. My advice would be to lay it out like I have it in the pic below and measure the over all length and width you’ll need. Don’t forget you’ll also need extra for the head rests and long strip for the piping on the back of the seat.
• ½ Foam Padding (Green) - From JoAnn Fabrics. I think it runs about $10 a yard at JoAnn’s so having another 40% off coupon handy will help.
• Coat Hangers – Cheap wire hangers from Wal-Mart. The ones wrapped in white plastic that run a couple of bucks.
• Mini Bungee Cords – They come in 8 Packs at Home Depot
• Jean needles for the sewing machine
• Regular Upholstery Needles or just some larger needles
• Seam ripper
• Thimble (Get one. If you don’t you’ll wish you had one when you start to hand sew the plastic trim)
• Flexible measuring tape
• Good straight edge
• Good pair of scissors – I also bought a scissor sharpener from Wal-Mart to keep the scissors nice and sharp.
• PeelnStick Fabric Fuse Permanent Adhesive Rolls – It’s about $3 at Wal-Mart and I think I used 2 rolls of it.
• Bias Tape – It’s the black cloth for the back side of the double stitch – It’s cloth trim that looks kind of like ribbon (it’s not ribbon though) you can get in different widths. I think I got it in 1 inch width. It’s also in the sewing section at Wal-Mart.
• Nylon upholstery thread – 94 cents at Wal-Mart. I think I went through at least 2-3 rolls of it.
• Spray Adhesive – I used the 3M
• Masking Paper and Tape (Optional)
• Wire snips
• Needle nose pliers
• Couple of good Sharpie’s (Pens)
• One thing I was going to buy but ended up not needing was hog rings (I think that’s what their called). They’re only used on the bottom of the seat back and I really didn’t find them necessary.
• Last but not least you’ll need allot of free time, patience, blood, sweat, and maybe a few tears
I’m sure I’m leaving something out. If you notice anything missing from the list let me know and I’ll add it.
BEFORE YOU GET STARTED
If you’re a noob like me and not familiar with the different sewing techniques I would spend a little time researching them before you begin. I found a bunch of good YouTube videos on the internet of the different types of stitches that really helped. I also did allot of practice runs on the vinyl I used to get my machine set up with the perfect thread tension and stitch width. Most importantly, take some extra time to practice the double stitch since it’s the one stitch on the seat that’s visible. The quality of that stitch will be the difference between upholstery that looks amateur and upholstery that look professional.
STEP 1 – Ripping the Seams
Pick the seat in the best condition; usually it’s the passenger seat. Remove the upholstery from the frame and inspect it to ensure you can get good templates from it. If they’re good start ripping the seams and stitching on the plastic trim with the seam ripper. Remove all of the padding from the backs of the upholstery. Set the 3 plastic trim pieces and the piping that runs around the back of the seat aside (It’ll be recycled). Once the panels are apart mark their locations on the back. On some of the pieces it’s best to mark the orientation of the piece since some of the square panels are tapered just a bit. If you plan on dividing the center seat back and seat bottom panel like I did now would be the time to cut those pieces in half and mark their location and orientations also.
STEP 2 – Creating the Template
Once you have all of the seams ripped trim the templates down to the original factory stitch line (Don’t cut on the double stitch line or the template will be too small). Doing so will give you the exact size of the panel needed without the excess material messing with the shape. If you trace the template with the excess material; it will make it difficult to get the seams lined up and the pieces sewn together straight. After the pieces were traced on to the vinyl I added a predetermined measurement around each template which I’ll explain later.
STEP 3 – Tracing the Template
Lay out the pieces and trace them with the sharpie onto the back of the vinyl. If the original seat upholstery is too warped and hardened from age heating it with a heat gun or hair dryer will soften it up enough to flatten it out. If that doesn’t work you could probably take an iron to it. I know this will sound like a no brainer but make sure you have the backs of the pieces facing up on the back of the vinyl. I made that mistake cutting my carpet templates and a whole set came out backwards. Marking the holes for the bolts and headrest really isn’t necessary. Those holes can be made once the upholstery is finished and fitted on the seat frame.

STEP 4 – Adding Fabric around the Circumference of the Template
This part is a little time consuming but worth the effort when you start to sew the panels together. Explaining it is a bit difficult in text so if you have any questions about this part let me know and I’ll try to go into as much detail as possible. Reason being, this is where you’re going to add the additional measurements around each piece and if you botch it you’ll end up having to trash allot of fabric. In the pic below all of the cut pieces have been traced on to the fabric using a thicker green sharpie. This is the inside line that you’ll actually sew on. The thinner line around each traced piece is the amount of fabric you’ll add to each panel to help you keep them aligned or extra to perform the double stitch technique. This outside line (the thinner one in the pic) is the one you’ll use to cut out the panel. There are also a few pieces that have an inch or so added to them that will be used on the inside of the seat to hold the wire that keeps the upholstery snug to the seat.
Here’s what you’ll need to add to each piece:
* Add 3/8 ths of an inch to the side of any piece that will be double stitched. Not around the whole piece just the side to be double stitched.
* Add 1 inch to the four pieces that make up the center seat back and center seat bottom. These are the panels that I split which will also house the wire hanger. Don’t add it to the entire piece just the sides circled in pic 2 and 3 below.
* Add ¼ inch around everything else.


STEP 5 – Back-Up Templates (Optional)
I wanted to keep a back up set of templates to use at a later date if I need them without having to keep the old crap seat upholstery. So I transferred the vinyl cutouts over to masking paper. If you don’t want an extra set of templates and you’re going to do both of your seats at the same time you can skip this step.
I did this for another reason also. I started the upholstery on my passenger seat and then waited a week or so before I got to my drivers seat. So I could exactly match the templates for both seats I transferred the already cut templates over to masking paper before I started sewing them. Then I cut the templates from the masking paper and copied them over to the vinyl for the second seat once I corrected a few mistakes that I had made on the first seat. It was easier and more accurate than using the original factory upholstery pieces that are difficult to lay flat. But if your doing both seats at the same time and you think the templates are pretty accurate you could just take the cut vinyl templates and copy them onto another sheet of vinyl before you start sewing them together. I didn’t get my first set perfect the first time around so I’m glad I didn’t waste the time transferring the first set onto the vinyl for the second seat.

STEP 6 – Sew the Panels
Just a tip before you start sewing the panels together: If you use the same vinyl fabric I used be cognizant of the fact that it will stretch and contract some depending on the sewing techniques you use. Notice in the second pic below how the left side panel is lower than the right. The tops of those panels are aligned perfectly however when I started sewing I must have stretched out the left panel more than the right. You can see in pic one (which is the first seat I did) that both sides came out even.


Start with the Seat Bottom.
1st – Sew panel 1 to panel 2 with a single stitch. I actually did multiple passes on all of the stitches to reinforce all of the seams.
2nd – Sew panel 3 to panel 4 and panel 5 to panel 6. First single stitch both to make sure the panels are lined up correctly. Once you get them perfect double stitch the seams before going any further.
3rd – Sew both outer panels 3, 4, 5 & 6 to the sides of panel 1 and 2.

Here are some details on the double stitch technique I used. First perform a quality single stitch (like I said before I did multiple passes on all of my single stitches). Then fold the excess 3/8” of fabric over on the back side and use some of the adhesive tape to hold it spread in place. Then put a piece of adhesive tape all the way down the seam and put the Bias Tape over it. Once you have all in place double stitch the seam. Note: Try to keep all of the adhesive tape under the Bias Tape so it doesn’t hang up your fabric while going through the sewing machine. Sorry I didn’t take any pics of this part of the process. If there’s interest I may try to recreate the process at a later date with pics.


Sorry that’s all I have together right now. Here are some more pics to keep you busy until I have time to finish the rest of the write-up.
Rick


Last edited by Foster48x on Mon Dec 06, 2010 12:46 am, edited 1 time in total.
-
azygoustoyou
Re: Interior – Before & After
Rick,
I think you should add that before you cut your patterns, You have to think about how the material is going to sit on the seat. Vinyl stretches in one direction. So you want to cut the pattern in the way that you want it to stretch. Just trying to help.
I think you should add that before you cut your patterns, You have to think about how the material is going to sit on the seat. Vinyl stretches in one direction. So you want to cut the pattern in the way that you want it to stretch. Just trying to help.
- fiatfreak
- Posts: 63
- Joined: Sun Jun 07, 2009 1:04 am
- Your car is a: 1969 124 Spider
Re: Interior – Before & After
Nice write up. I've done a few cars myself including my '80 Spider. The head rests were the hardest part!
Never thought about orienting the fabric for stretch, but that make a lot of sense. Some one makes a 4-way stretch vinyl which, I believe, Fiat used on the 2000 cars.
Never thought about orienting the fabric for stretch, but that make a lot of sense. Some one makes a 4-way stretch vinyl which, I believe, Fiat used on the 2000 cars.
